How to create an eCommerce Website Using WooCommerce (Ultimate Guide)
INTRODUCTION
Do you want to learn how to set up WooCommerce eCommerce websites? Then you’re in the right place. WooCommerce, a popular WordPress plugin, allows you to create an online store. It is a free eCommerce platform, which makes it easy for beginners to use. This plugin can be easily added to your WordPress website and you can start selling online. You don’t know what to do? No problem. We’ll show you how to create a WordPress eCommerce site with WooCommerce in this article. Let’s go.
Why Choose WooCommerce for an eCommerce Website?
There are many online platforms that you can use to create an eCommerce site. WooCommerce is by far the most popular, as it offers many unique features.
It’s a WordPress plugin that is free which means it’s free to integrate it to your WordPress website without additional charges.
WooCommerce can also be used to sell any type of product. WooCommerce allows you to sell physical products such as jewelry, clothes, and other accessories, as well digital products such photos, eBooks, and so on from your WooCommerce shop.
There are many WooCommerce-compatible themes and plugins on the market. This will allow you to create a professional-looking website with many features.
You can also easily modify your eCommerce website with its unlimited customization. Hence, WooCommerce is the best option to build an eCommerce website or an online store.
Building an eCommerce Store with WooCommerce (Step-by-Step)
Already, we discussed the benefits of creating an eCommerce website with WooCommerce. Let’s now look at the step-by-step guide to help you create an eCommerce website with WooCommerce.
Step 1. Buy Hosting and Domain Name
You will need to buy web hosting and domain names before you can start your eCommerce store.
Web hosting simply refers to a web space on the internet where you can store your website files. A domain name is also the name of your website. For example Google.com, Wikipedia.com, ThemeGrill.com, etc.

An SSL certificate is also required. An SSL certificate will be required to verify that your website is secure. Customers can then make online payments without hesitation.
Hosting companies often offer free domain names and SSL certificates with their hosting plans.
Still on how to create an eCommerce Website. Let’s now discuss how to select a hosting plan that will support your WooCommerce site.
How do you choose a hosting plan?
Web hosting is, as we have said before, the foundation of any website. It can affect the performance, speed, security, as well as user experience of your website. Therefore, it’s advisable you choose a hosting plan carefully for your website.
WooCommerce hosting plan is required to create an eCommerce site using WooCommerce. WooCommerce hosting offers a special web hosting package specifically designed for WooCommerce-based websites. These hosting packages include features that allow you to manage products and shipping as well as accept payments.
So, while choosing a WooCommerce hosting plan ensure it has many features included that will help you run your store easily. It is also important to evaluate the level of support it provides and its cost.
These are some of the top WooCommerce hosting companies in the market:
- Bluehost – Starting from $12.95/month
- SiteGround – Starting from $6.99/month
- Kinsta – Starting from $30/month
We’ll make use of Bluehost for this tutorial as it’s one of the best WordPress hosting providers. It provides affordable hosting plans with advanced features.

Bluehost also includes a free domain name and free SSL certificate as part of its hosting service. Meaning you don’t have to buy a separate domain and SSL certificate to run your online store.
How do you choose a good domain name?
You should know these things before you choose a domain name to use for your website. It is the identity of your eCommerce website so you need to be careful before you make a decision.
Your domain name will be used to contact potential customers. Your website name will be what they type in their web browser every time they visit your online shop. Always choose a unique domain that will attract customers’ attention.
We have listed some things you should consider before choosing a domain name.
- Short and simple: It is difficult to remember a long, confusing domain name. Choose a domain name that is simple, catchy, and short. This will allow customers to easily search your website.
- Represent your website type: The domain name should assist visitors in identifying the type of website they are visiting. It should reflect the theme of your website. For example shoppingtoday.org, buymycloth.com, lookingood.org, etc.
- Unique: Make sure you choose a unique domain name for your site. Else, it can confuse your potential clients and they may find themselves on your competitor’s eCommerce website.
How do I buy web hosting for my eCommerce site?
This WooCommerce tutorial will show you how to purchase Bluehost WooCommerce hosting.
Bluehost was recommended by WordPress.org and we chose it. Bluehost’s hosting package includes WooCommerce-based features, pre-installed WordPress, WooCommerce, and Jetpack.
First, Click here to go to the Bluehost WooCommerce official page and click the “Start Your Store” button.

The WooCommerce pricing plan will then appear on your screen.
You will see two hosting plans: Premium and Standard. The standard plan is for beginners who want to open an online store. The premium plan is for eCommerce store owners who wish to expand their online business.
Simply click the “Select” button.

You will now be directed to a page where your domain name must be set up. Bluehost provides a free domain name service as part of its hosting plans. This allows you to create a new domain name for your eCommerce website.
To check if it is available, enter the domain name you have selected and click on “Next”.

You’ll then be taken to the next page, where you will need to enter your personal information. Scroll down to complete your details.
You will also find a section that allows you to enter your payment information, i.e. credit card details. Finally, click the “Submit” button to submit your WooCommerce hosting order.

You’ll then receive an email with details on how to log into your hosting control panel. Follow these steps to log in to your cPanel.
You’ll again see a popup informing you that WordPress has been installed. There will also be a button to log in to your website. Click on it and you’ll be taken to your WordPress dashboard.
That’s all.
Step 2. Install and Setup WooCommerce
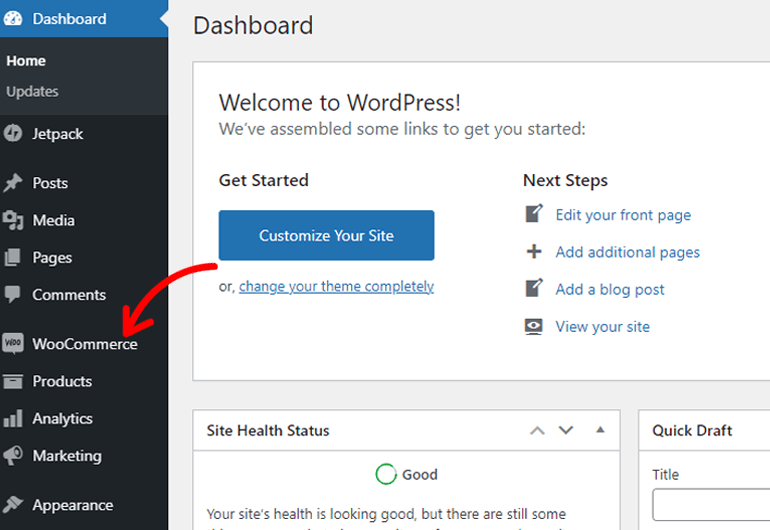
WordPress and WooCommerce are automatically installed, as we mentioned previously. You’ll see the WooCommerce setup wizard as soon as your login to your dashboard.
If it doesn’t happen, locate ‘WooCommerce” on the left-hand side of your screen and then click on it.

We’ll now discuss the steps you need to take to set up WooCommerce. Only then can you create a WordPress eCommerce website.
Add Store Details
First, you’ll have to enter the details of your store. You also need to enter the address of your store in the ‘Address line 1’ block. If your store is located in any other location, you can enter the address in the ‘Address line 2’.
Also, select the country/ region where your online store is located. You will need to mention the city and its postal code. Finally, click on the ‘Continue’ button.

Choose the Industry
This step will allow you to select the industry that your online shop belongs to. Select the options that best match your product. There are seven options. Select one option and then click on “Continue”.

Product Type
You need to decide what type of product you want to sell. You don’t have to pay additional fees if you are selling physical products or downloads. You will need to pay an additional fee if you sell subscriptions or memberships, bookings, bundles, customized products, or other services.
Once you have made your selection, click the “Continue” button to continue on to the next step.

Enter Business Details
You will need to enter the number of products that you want to list on your eCommerce site. Click on the downward arrow button to choose your favorite option.
You should also mention whether you are currently selling your products elsewhere. Click on the downward arrow again and select an option. Finally, click the ‘Continue to finish’ button.

You’ll then reach the “choose theme” page. This step can be skipped as we will discuss changing the theme for your WooCommerce store later. Click on the “Skip” button at the bottom of the page.

That’s it. You’ve complete WooCommerce setup process. Next, we’ll install a theme
Step 3. Choose a Perfect WooCommerce Theme
A WordPress theme is simply a tool that enhances the website’s appearance. It helps in making your site attractive and professional. Choose the right WooCommerce theme to create your eCommerce website.
It’s important to decide which WooCommerce theme is most suitable for your eCommerce store as it determines the overall look and feel of your online store. This theme will also impact how products are displayed on your website.
Here, we have chosen to use the eStore theme by ThemeGrill.

This responsive WooCommerce theme is completely customizable. The theme includes many features and custom widgets to help you make your online store professional.
You can also try the Zakra theme, which is another powerful WooCommerce theme. You can create stunning websites with it because it integrates with powerful page builders such as Elementor and Brizy builder.
Let’s now discuss how to install a WooCommerce theme.
How do I install WooCommerce Theme
Find ‘Appearance’ on the left side of the screen and hover your mouse over it. From the popup click on ‘Themes’ after which you’ll reach the add new themes page. There click on the ‘Add New’ button.

You’ll now be taken to the add themes page. Here you will find the search theme box. To see the eStore theme in the search results, type eStore.

Again, hover your mouse cursor over the theme result and click on the ‘Install’ button. After a while, you’ll see the ‘Activate’ button. Click on it to activate the theme.

This will allow you to install the eStore WordPress theme, and then create an eCommerce site using WooCommerce.
How do you import demo for your eCommerce website?
You’ll find a welcome message from eStore on your dashboard. Click the ‘Get Started with eStore’ button.

After a while, you’ll reach the demo importer page. There you’ll find different demos of the eStore theme. Move your mouse over the starter demo you wish to import. Click on the ‘Preview’ option if you want to preview the demo else click on ‘Import’ and ‘Confirm’.

That’s all.
Step 4. Add Products to Your Online Store
Find ‘WooCommerce” on the left-hand side of your screen, and click it. This will take you to the WooCommerce homepage. You’ll find different steps to complete in order to fully build your store.

Let’s begin by clicking on “Add products”. There are three options for adding products: manually, import them, or migrate the products from your other store.

Let’s now discuss how to add products to your WooCommerce store.
How to Add a Product Manually?
First, click on “Add manually” option after which you’ll reach the add new product page. Then you need to add the name, image, and a detailed description of your product. Then you need to select the ‘Product category’ from the right side of your screen.

Scroll down to locate the ‘Product Data’ section. Select the product type from the dropdown menu. Add the selling and regular prices of the product from the “General section”.

You can also manage the stock of your product from the Inventory section’. You can also modify the stock status of your product.
Further, click on ‘Shipping’ and add your product’s weight, length, height detail. From the ‘Advanced section’, you can even add the optional note that you wish to send to your customers after they make a purchase.

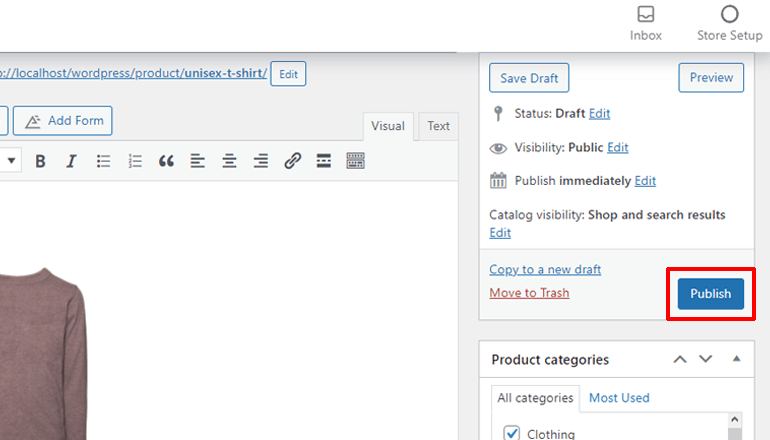
Scroll down to the “Product Short Description” section and provide a brief description of your product. Here you can add your product picture. Finally, click the “Publish” button to make your product visible in your shop.

How to Import Product via CSV?
CSV (Comma Separated Values) files can be used to import your products. CSV allows you to save data in tabular format. This is a good option for large store owners, as they can import all their products simultaneously through a CSV file.
Simply click on the “Import via Excel” button to open a new page. Next, click on the ‘Choose File” button to choose a CSV file that is no more than 2MB from your computer. Click on ‘Continue.

After that, the Column Mapping screen displays and WooCommerce will attempt to match the Column Name from your CSV to Fields.

From the dropdown menus on the right side, you can modify fields or indicate ‘Do not import’. Any column that is not recognized by the system will be rejected and it won’t be imported automatically. Again, select the ‘Run the Importer’ button.

Your products will be imported in the next step. Wait for a while and don’t refresh or touch the browser while in progress. That’s all.
How to Import Product from Another Service?

If you have an eCommerce store that currently sells elsewhere, you can use the product migration service and migrate your products easily. The Cart2Cart extension is available to do this. Through this WooCommerce extension, you can move your store info from 85+ eCommerce platforms to WooCommerce in a few simple steps.
Step 5: Setup Other WooCommerce Services
We have already discussed the steps involved in adding products to your WooCommerce store. Let’s now discuss other WooCommerce services such as payment methods, tax rates and shipping costs.
How to Choose Payment Methods for WooCommerce Store?
Click on ‘WooCommerce” again and then click on Home’. You’ll then be taken to the page that explains the steps required to fully set up your eCommerce site.

You can click on “Choose payment method” to go to a page that offers different payment options. You’ll see 3 options: PayPal, cash on delivery, and Direct Bank Transfer.

Click on the “Set up” button to enable PayPal as your payment gateway. PayPal will now be automatically downloaded to your WooCommerce shop. You will need to link your PayPal account after you’ve purchased. Enter your account details and click on ‘Proceed’.

If you don’t wish to use PayPal, there are two alternative payment options. You can get cash payment upon delivery by selecting the “Cash on Delivery” option.

You can also use the “Direct bank transfer” method. You can click on the “Set up” button and you will be directed to a page that will allow you to enter your bank details. After that, click on the ‘Save’ button. That’s it.

How to Add Tax Rates?
You will now be redirected to the WooCommerce homepage. After clicking on “Add tax rates”, you will see the “Set store location” and “Configure tax rate” options. You don’t have to change anything since you already set up WooCommerce and added the store location. Click on the “Configure” button located below the “Configure tax rates” option.

You will then be taken to the tax rate settings screen, where you can set your tax rates. The screen will display the tax rates according to your state code and country code. It is also possible to manually add it by clicking on “Insert row”. Finally, click on “Save changes”.

How to Set Up Shipping Costs?
After you have added the tax rates, you will be directed to WooCommerce’s homepage. Click on the “Set up shipping costs” option to see additional options: ‘Set store location’ and ‘Set shipping costs’.

Add the shipping cost manually. You don’t have to add anything if you offer free shipping. You can also enable the “Rest of the World” option if your product is to be sold worldwide. Add the shipping costs to the area, and then click the “Complete Task” button.

How to Personalize Your WooCommerce Store?
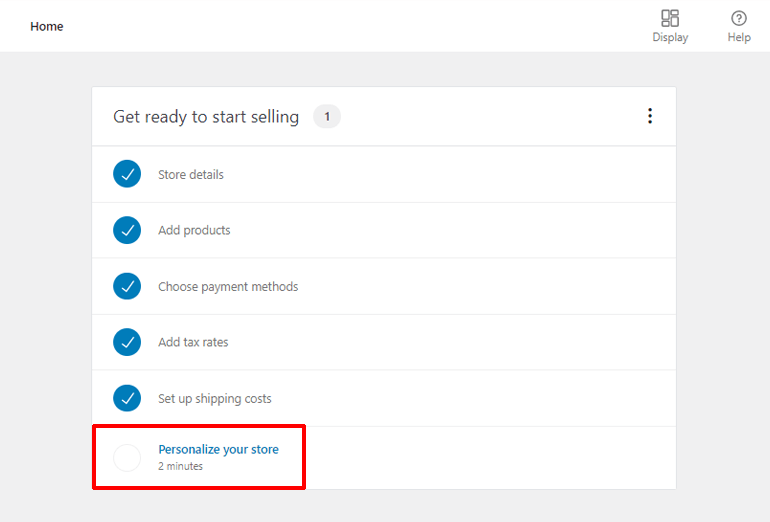
This is the final step to complete the WooCommerce setup process. You can personalize your WooCommerce store by clicking on the “Personalize my store” option. This will take you to a page where you can create a homepage and upload your store logo.

To create a new eCommerce website homepage, simply click the “Create Homepage” option. You can choose to use the homepage offered by your theme or click the ‘Skip’ option. By doing this you can still change the logo of your existing homepage.

Click on the “Remove image” button to upload a new logo. This will delete the existing logo. Next, click on the “Add an image” button to browse the logo you wish to add. Finally, click the ‘Proceed to continue’ button.

You can also create a store notice. You can edit the store notice text by clicking on the “Complete Task” button.

Step 6. Install Additional Plugins and Extensions
You have now successfully built your WooCommerce eCommerce website and you can begin selling your products. You can install additional plugins or extensions to enhance the functionality of your eCommerce site.
You can integrate many plugins and extensions with your eCommerce site. Let’s take a look at some plugins and extensions that you can use to enhance your WooCommerce store.
Customize My Account for WooCommerce

This extension plugin was created specifically for WooCommerce. It allows you to customize the “My Account Dashboard”. The design editor tool is very customizable and simple to use. This plugin allows you to modify the font, font size, font color as well as background color for ‘My Account Dashboard’. It is also possible to create new tabs without any coding.
Everest Forms

Everest Forms, a WordPress form plugin that is compatible with WooCommerce, is one of the best. This plugin is simple yet powerful and has a drag-and-drop form builder that makes it easy to control and use the form. It’s also mobile-responsive and can be translated into multiple languages. This plugin makes it easy to create login forms and customer surveys.
Yoast SEO

Yoast, the number one WordPress SEO plugin, helps you rank higher in search engines. It includes everything you need to manage your website’s SEO. It will make your eCommerce website more efficient, faster, and stronger, so it can be competitive with other sites. This plugin can be used to increase the SEO of your online shop and attract more customers.
Sucuri Security

Sucuri Security is a WordPress security plugin that has been globally recognized. This plugin comes with several security features that will protect your website. Security is an important factor, especially if you are handling card payments. So, this plugin will ensure the overall security of your eCommerce website.
MonsterInsights

MonsterInsights, a Google Analytics plugin, allows you to track the top products, landing pages, and categories. You can also use it as an eCommerce addon to see your website’s overall stats so you can increase your sales. It allows you to track customers’ activities on your website, and analyze the trends.
How to Install Plugins to Your WooCommerce Store?
These plugins can be installed easily on your eCommerce website. You will need to follow the same steps as you did when installing the WordPress plugin.
First, hover your mouse over ‘Plugins’ at the left of your screen. Click on the button ‘Add New’ which will take you to the add plugins page.

On the right side, you’ll find a box for searching plugins. Simply type the name of your plugin. You’ll then see the plugin in the search results.
Click on the ‘Install Now’ button and wait for a few minutes. After that, click on the ‘Activate’ button. The plugin has been successfully installed on your WooCommerce store.

Conclusion
We trust that you found this tutorial on how to create an eCommerce website helpful. We hope you are now able to create an eCommerce website with WooCommerce.


10 comments
Hello Bamidele
Thank you very much for this eye opening piece.
I have a question
I sell both products and services
Can I use this Blue host wooCommerce to create landing pages for my services or is it strictly for products
Thanks for the wonderful article. So rich.
Thanking you madam for this information, am about to start mini importation business before the end of Feb, but I don’t know how and who to sell to , pls how do I setup it up perfectly to be very catchy, unavoidable to clients, I need some body to direct since is my first time
Thanks ma. I’ll give it a try
I like everything here
I like it
Very good information, thanks for that.
Please Ma can I use one domain for general goods is to deal in all/some products.
Thank you so much for these enormous values you are sharing to us on daily basis. With this I am already building my eCommerce website. You are an embodiment of truth and sincerity. And I will follow you everly. May God bless you the more.
thank you ma’am God bless you richly
Thank You ma
More knowledge