How To Create a Free Website Using Weebly Website Builder In Less Than 60 Minutes
Until lately, it would cost a few thousand dollars for a professional to construct your website. However, with today’s simple-to-use DIY free website builders such as Weebly, you can finally have an excellent small business site up in under one hour.
CLICK HERE TO VISIT WEEBLY OFFICIAL WEBSITE
Weebly stays one of the leading free website builders out there. Weebly is a good alternative for small business owners that want to construct a site quickly, easily, and at a reasonable price.
Continue reading to find out how to make your free website using the Weebly site builder in 7 easy steps.
Step one is to visit Weebly.com To create your free website

When you click on sign up, you will be taken to a sign-up screen that looks like the one below.
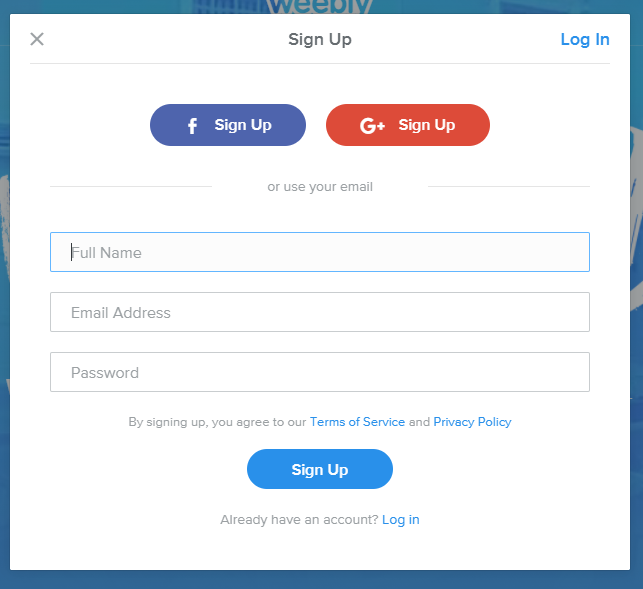
Click on the “Sign up” button and you’ll be taken to a page that asks you if you would like to sell online or not.
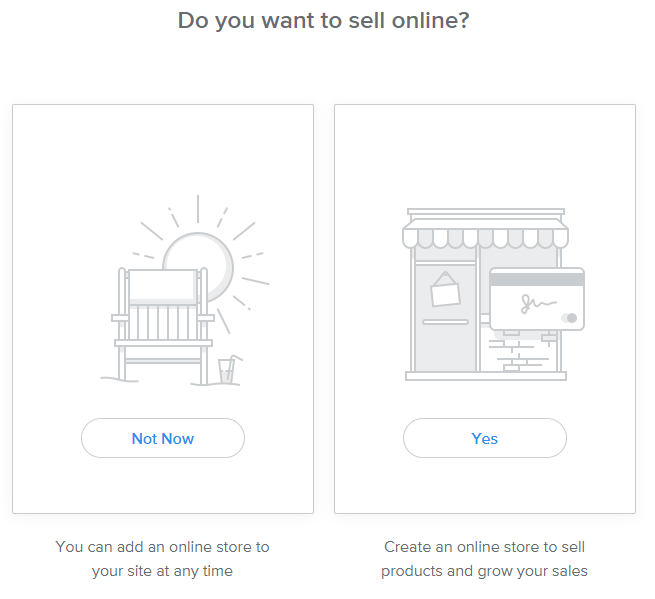
Do not be worried if you are not selling online yet but are amenable to doing this in the long run. It’s possible to add an internet store to your site at any moment. Therefore, if you’re going to use your own Weebly free website solely for blogging or anything else, then you can pick “Not Now”.
Step Two: Select a Theme
The next step is to figure out what kind of template or theme you would like to use for your free website. Weebly provides a vast choice of new, modern themes that could work for a number of purposes. A Particular theme will likely make more sense for the company than others.
A number of important things to remember when choosing a Template/Theme:
You can change the theme anytime — The Weebly Site Builder, unlike rival Wix, permits you to change themes at any moment. After you change a theme, each of the info you’ve generated is automatically imported into the new theme, which means you don’t get to lose any vital information. So, it doesn’t matter the theme you start your free website with. You can always switch to a more preferable theme later.
Weebly has industry-specific themes — Even though any template can be tailored to fit almost any market, most are pre-designed for a specific sort of company. If you don’t want to put in a lot of work while customizing your theme, you can as well decide on a theme that’s already designed for your own industry. Then, actually, all you’ve got to do is simply change the images, page names, and text.
Always ask, “What am I trying to accomplish?” — Some websites are better at attaining certain goals compared to many others. For an instance, if your primary objective is to receive leads using an action button, then a theme such as the one below is best.

Instead of having a variety of places to click, it just provides one option, “Plan Your Adventure,” and makes that the central focus.
If you’re searching for more of an informational Website, then you likely need a template such as the one below.
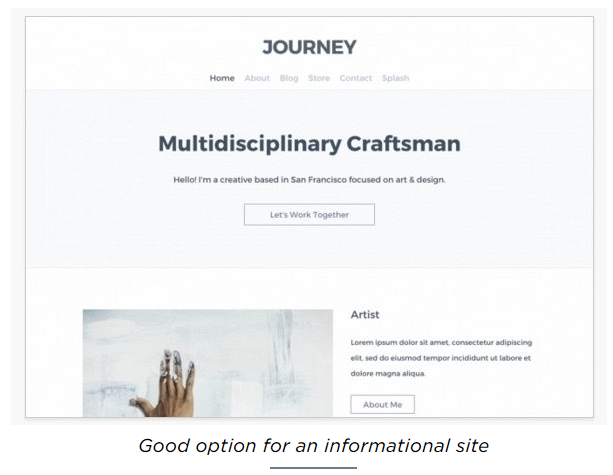
It has clear tabs at the top where your customers can navigate to different pages of your Weebly site to find out more about your small business. Additionally, it has several hyperlinks to additional pages on the website as you scroll down the site, that can enable visitors to browse around and see what you’re about.
You are able to preview any template you’re interested in by just clicking on the theme picture.
Once you have made up your mind on the theme you want to use, simply click “Start Editing” at the top right-hand corner of the Theme Preview page.

Step Three: Pick Your Domain Choice
The next thing you will notice is your domain option page. It looks like the image below:
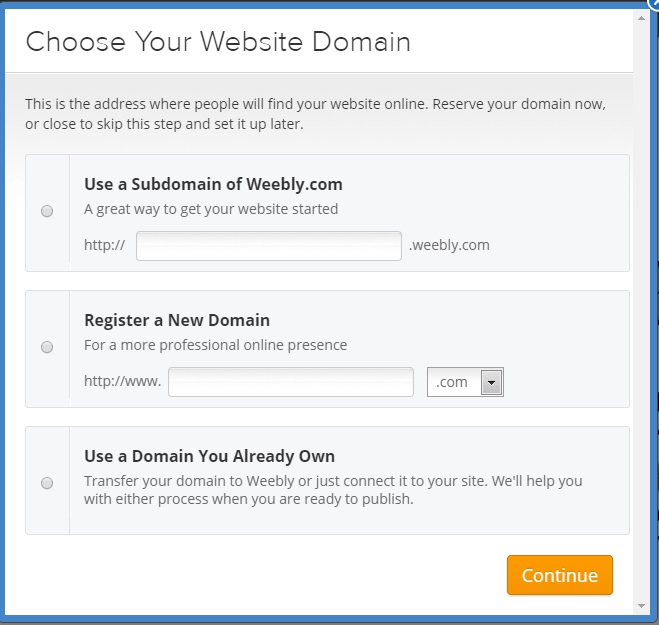
If you’d like a free Weebly site, your sole option would be to use the subdomain of weebly.com. But your domain will not be as exceptional, however, you won’t need to pay anything.
If You’d Like Your Own Unique Domain Name, You’ve Got 3 Choices:
Get one through Weebly — It’s free for your first year with A paid package and then about $20/year subsequently.
Purchase one via a third party and link it to your account — I highly recommend you go with Namecheap for the domain name registration. You can register a domain name for as low as $5.68/year if you follow this link Namecheap.com
Make use of an existing domain name — Should you already possess a unique Domain name, it is possible to link it to a Weebly site. It’s somewhat complex, but a lot of domain providers can do this for you if you make that request.
Please note; that if you make up your mind to use your own custom domain name, You’ll need to obtain a Weebly site premium package. All paid packages permit you to make use of your own special domain name.
Step Four: Construct Your Weebly Site
As Soon as You have chosen your domain name, then You’ll Be taken to The Weebly site builder page, which is where you will actually do all of the significant construction of your site.

This is a breakdown of the Weebly website builder:
Element Bar — The Element Bar is on the left-hand side Of the builder, as indicated by the red box above. “Elements” are only all of the components you are going to use to construct your website. To add an element to a page, just click on an element (and hold) and then drag it and drop it where you want it to be on the webpage to the right.
Site Tabs — Just like most website builders, the Weebly site builder has a navigation tab (yellow box) along the top of the page. The tabs are, “Build,” “Pages,” “Theme,” “Store,” “Apps,” and “Settings.” To alter the bigger parts of your website, just click on the corresponding navigation tab to edit the settings.
Site Preview — This reveals the real components of your website. The blue box is around the site preview area which shows the actual display of what your website will really look like.
Adding & Editing Pages
If you want to add, delete, or edit any of your page settings, simply click on the “Pages” tab at the top of your Weebly website builder screen. You will then be taken to the page’s screen.
When you first begin, you will likely only have a few active pages. In this theme, you will start out with a “Home,” “About,” “Services,” and “Contact” page, as shown below.

To add a page, just click on the white + signal near the top left of this webpage (highlighted by a red box in the picture below). If you would like to edit or remove a current page, click on the little folder icon beside the page name (highlighted by a blue box in the picture below).
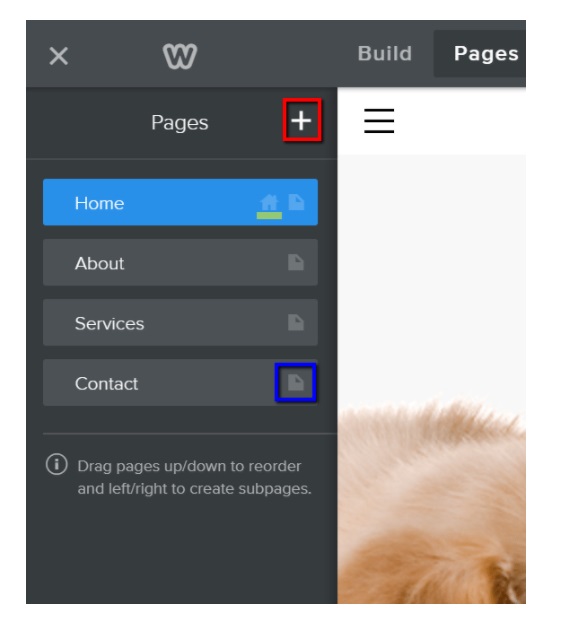
You can change the page sequence by simply dragging each page name above or under the other names.
There Are Numerous important items to take note of here:
Your webpage is the default homepage — If you look carefully, you will notice a small home icon (underlined yellowish in the picture Above) alongside the “Home” page folder icon up there. This signifies which of your Pages would be your “Homepage,” the very first page visitors will see on your Weebly Site (at least in many instances), will be assigned as your homepage.
You May drag-and-drop a Webpage to the right-hand side to Make a Subpage — In case you would like to create a webpage that would not appear on your most important pages tab, then you’ll want to create a subpage. To do so, you will create a page like a regular page, rearrange it so that the page is below whatever principal page you would like it to be connected to, and then drag it to the right-hand side. This will produce a subpage as indicated below.
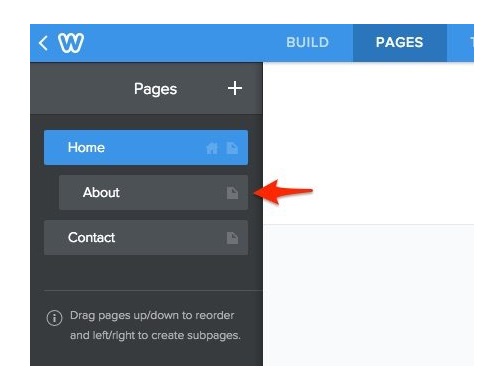
In this case, the “About” page is now a subpage of the “Home” page.
The Most Important pages on your tabs will also be your navigation pages that people are going to see. As you can see from the screenshot above, the “Home” and “Contact” pages are the main pages and the “About” page is a subpage.
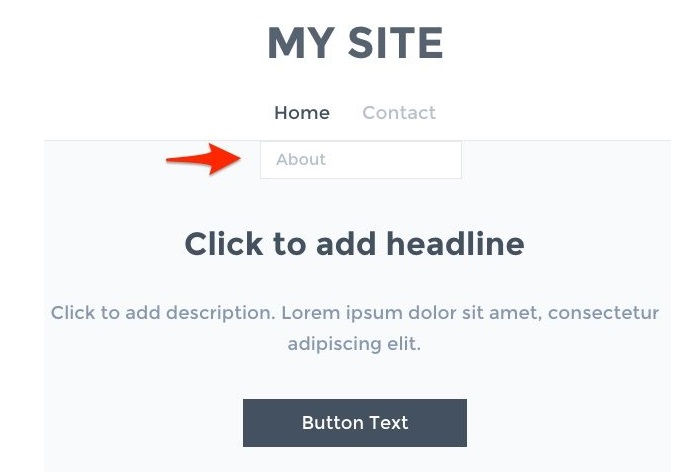
Which indicates that just the prominent pages will show up on your navigation bar. The subpages will show up whenever the related major webpage is hovered over by a customer’s mouse.
From the image below, you simply see the “Home” and “Contact” pages in the main navigation bar, but if you hover over the main page (as I did when the screenshot was taken), then the “About” page will appear in a drop-down tab.
Another thing to note here is that you can edit the settings on each page by clicking on the little folder icon mentioned earlier.
Whenever you do this, it will bring up this page, which permits you to make a number of changes. You are able to choose whether to conceal the page in navigation or alter the pattern of your total page design (landing, splash, title, etc) and also edit advanced settings too (page description, meta keywords, etc).

Altering or Editing Text Using the Weebly Free Website Builder
Altering or editing text from the Weebly free website builder is as simple as clicking on the text box or name that you need to edit. If you’re just beginning and haven’t entered any text, however, then the place will simply go blank once you click on it along with a text setting pub will pop up (as seen below). If you’re altering text you’ve already inputted, then you are going to need to delete it to add fresh content.
As you can see in the image below, I started typing the “Thi” before I took the screenshot.

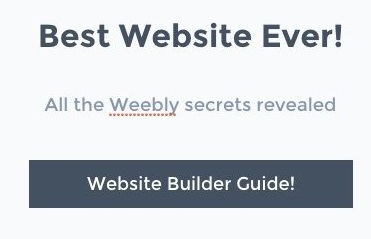
To edit the text in a button, It’s a bit more complicated. You must click on the button, and then you’ll see a pop-up window. You will then click on the “Button text” tab.
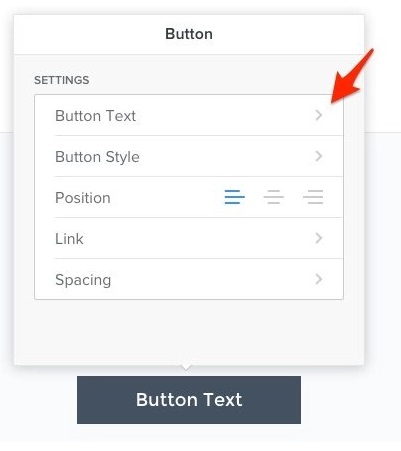
Then a window will appear where you can just type in your text. When you’ve entered your text, then you just click out of the window and the button must display the changes you have made. Displayed below is the result after I edited the text.
Changing or Adding an Image
To start with, assume you want to select a background image that’s already in your theme and only change it to something specific to your industry. It is simple!
Simply click on the image and then you’ll be provided with the options to either “Edit Background” or “Replace Header Layout”.
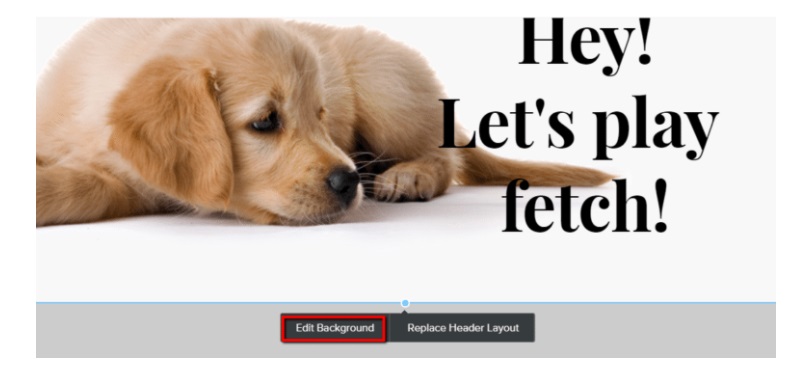
When you click the “Edit Background” button, then you’ll be taken to a page where you would select whether to “Replace” or “Edit” the existing picture. If you would like to change the current image, you will be taken to the Picture Editor window, where you are able to upload a picture from your computer or choose from different pictures available on Weebly.
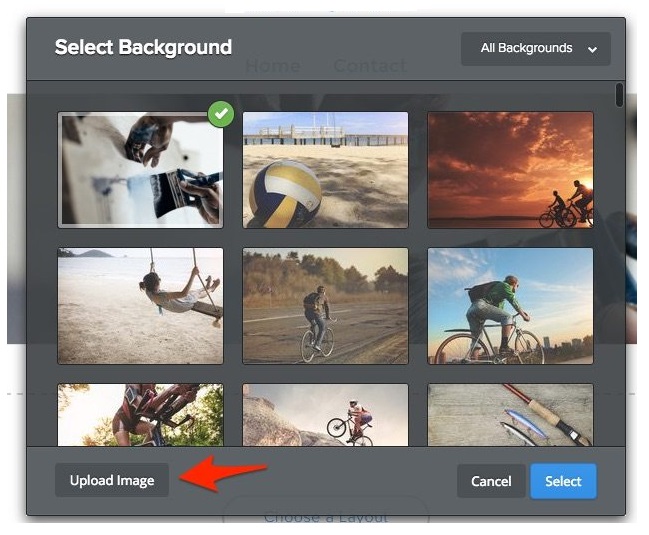
If you’re selecting a picture that’s part of a template’s page Background, as is the situation here, then you’ll find the image below as a popup. You are going to want to click on the “Upload Picture” button.
Then you will see this page, which will either Make It Possible for you To select a picture from the computer hard disk to include or you might also drag and drop a photograph here from your own desktop computer.
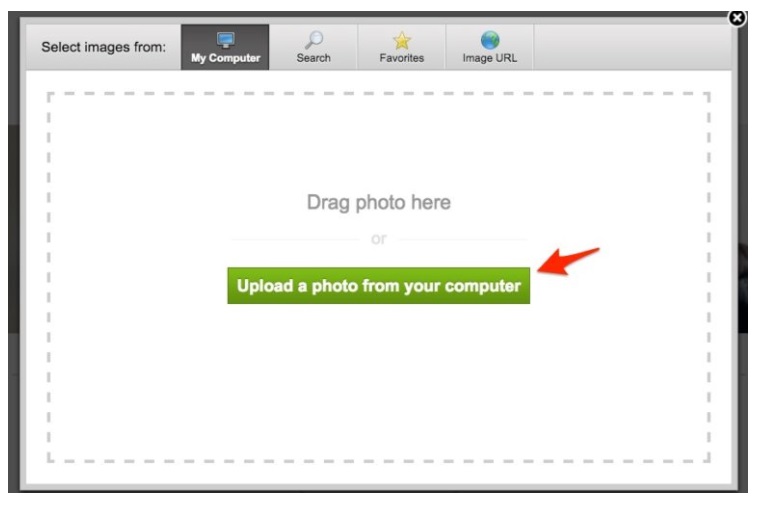
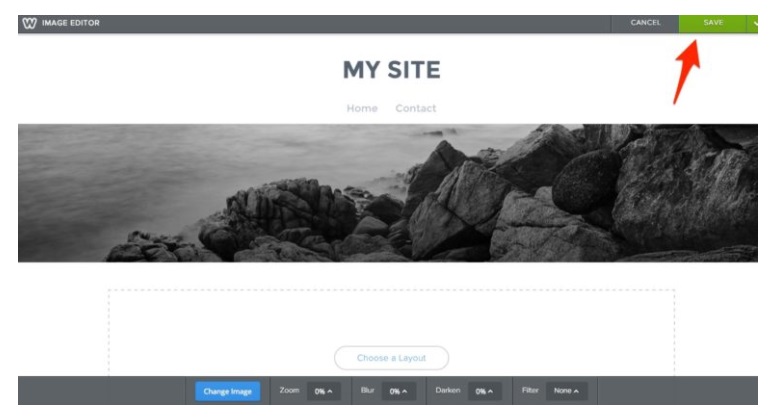
In a lot of cases, you will just click on the “Upload a Photo from the personal computer” button to locate your picture on your personal computer and then double click on it. After that, it is going to reveal to you exactly what the photograph will look like on the webpage, and then you will want to click on “Save” in the top right to make it official. You’ll also need to select whether or not you want it stored only to this page or to all webpages in your Weebly site when it relates to some header or desktop.
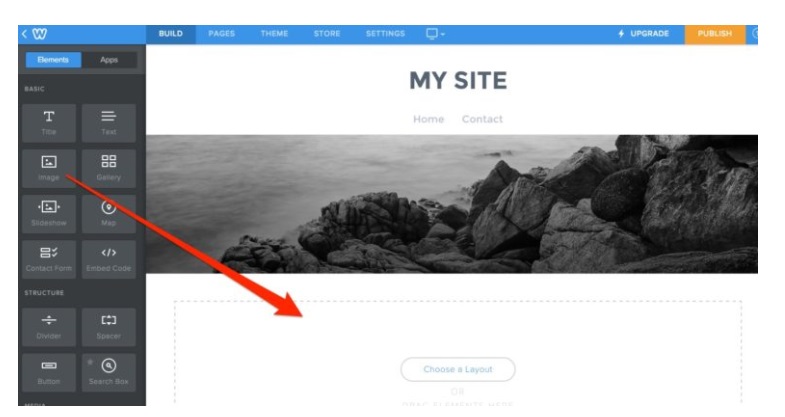
If There’s no picture already on a webpage and you just need to Include one, you merely drag and drop the “Picture” section from the Weebly site builder components tab onto the webpage, as shown below.
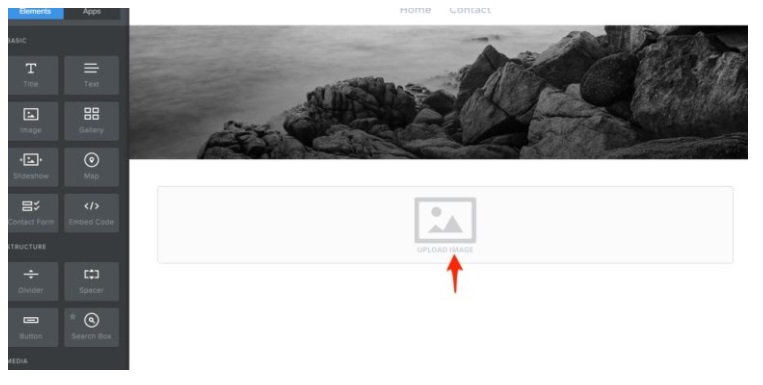
As Soon as You have done this, you simply click on the upload image box which appears.
After clicking, you will get the same window showing several slides earlier, with the green button that says “Upload a photo from your computer.”
In this circumstance, all you have to do is click on that button, then locate the file on your own computer, double click on the image, and it’s going to be automatically updated on your Weebly site, you don’t have to press “save” or any other thing.
Step Five: Explore Extra Components & Options
The Weebly site builder Provides you with lots of different Component choices.
For example, you can…
- Change your theme/template at any time
- Add maps to any page
- Establish a contact form
- Insert knobs or dividers
- Insert a Number of media, such as Videos and Audio files
- Insert a questionnaire
Plus Much More
The Majority of these activities are fairly self-explanatory once you are knowledgeable about the web builder. However, if you’re having trouble figuring them out, Weebly has excellent tutorials for each one of these activities which may be located in their Support Center. The tutorials are extremely much like this report, detailing everything you have to do and then demonstrating a screenshot of what everything looks like.
Step Six: Publish Your Weebly Website
As soon as you are finished with all of your first editings, It’s time to publish your Weebly free website and make it go live so people can easily access it. Bear in mind, that you may make adjustments to it at any time by simply going to the Weebly free website builder, therefore it isn’t like you’ve got to get it absolutely ideal before going live.
To make your Weebly free website go live, just click on the orange “PUBLISH” button on the top right-hand side of your editor.
If you’re using the free version, it is going to bring out to you the domain name choice window again just the way it did early on in the procedure.
The final thing you’ll have to do is put in a code to confirm you’re a human, and then hit on the orange “Ok, Publish my website!” button.
Step Seven: Decide What Sort of Plan You Need To Move Ahead
The free package is supposed to be more than sufficient for your free website. But, we do not advocate the free website if you would like a professional website since you won’t be able to use your own customized domain name, and Weebly advertisements will display on your web pages. Additionally, if you would like to have more functionality or an online shop, you’ll need to upgrade to a premium package.
Here’s a breakdown of Weebly’s package and what attributes are included with every one of them.
Needless to say, the Weebly free website builder is included with each plan.
Free – Unlimited pages, hosting, Weebly Subdomain, Weebly advertisement, 500MB storage limit, blog, email, and chat support service.
Starter ($8/month) – Free domain (1 year), hosting, no Weebly ads, unlimited storage limit, sell up to 10 products (3% transaction fee), email and chat support.
Pro ($12/month) – Everything in Starter Plan + phone support, HD Audio and Video Players, in-depth site reporting, sell up to 25 eCommerce products (3% transaction fee), site search, have up to 100 members.
Business ($25/month) – Everything in Pro Plan + unlimited membership, SSL security, unlimited eCommerce products, 0% transaction fee on all sales, integrated shopping cart on your domain, digital goods, inventory management, shipping and tax calculator, coupon codes.
Overview
For the typical small business owner searching for a free website, The Weebly site builder is an excellent option. It has plenty of sound features, is cheap, is straightforward, and is newbie-friendly. If you follow the step-by-step guide in this tutorial, you will end up having a professional-looking Weebly site in 60 minutes or less, without having to spend a dime!
And, if along the line, you decide to upgrade your plan to premium, you are able to do this at any moment, making Weebly a fantastic choice to scale with your company too.
PROVEN WAYS TO MAKE MONEY ONLINE FROM YOUR WEBSITE OR BLOG
I would show you various proven ways you can use to make money from your website or blog. These are methods I have personally used for over 7 years now. They are proven and guaranteed ways to make money online from your blog or website.


3 comments
Thanks allot.
I need more mail concerning building a church website that you can monetize also.
Thanks allot
Thank you for the option
thanks you my only leader aderonke bamidele god bless your family