

Everything you need to learn on how to create an ecommerce website with WordPress
How to make an eCommerce Website with WordPress
INTRODUCTION
You will need to purchase a domain and sign up for hosting in order to sell your products with WordPress. This guide will help you through each step!
WordPress is a powerful and popular platform that can be used to create an ecommerce website. You will need reliable plugins and good web hosting to make a successful online store on WordPress.
Namehero and WooCommerce are great options for building an online store. This is especially true if you want to integrate it with your WordPress site.
Click Here To Sign Up For A Good Web Hosting Plan With Namehero
Nine steps to launching your eCommerce website with WordPress
STEP ONE
Score the perfect domain name
Your website’s unique address is your domain name. It is the portion after the www.’ in your URL. Ours is ‘aderonkebamidele.com’, for example.
NameCheap allows you to purchase domain names. If you are lucky enough, the domain name you desire will be available for free and priced at the low standard rate of $10-20/year. If not, your dream domain could be unavailable or available for resale at an even higher rate, sometimes hundreds of thousands or more. However, this is only valid for the first year. After that, even the most expensive domain names will be renewed at the standard rate ($10-20/year).
It is a good idea to keep the domain name close to your brand and keep it short and memorable.

Click here to search and get your desired domain name for as low as $5.6/year with Namecheap
It’s good to know that ‘.com’ is the most popular and strongest domain extension (ending). This is a great choice for online shops, since it allows you to sell worldwide. You can choose a country-specific extension, such as.us. You risk limiting your ability to expand further down the line by choosing a country-specific extension.
Before you move on to the next step on creating your ecommerce website, ensure that you have:
- Thought of a memorable and relevant domain name for your ecommerce website
- Checked it’s availability
- Purchased it, and set a reminder to renew it next year.
STEP TWO
Sign up to a Web hosting provider
Now that you have your domain name registered, it is time to search for a web hosting service provider.
Hosting is essential for every website. Hosting is equivalent to renting land on the internet – make sure you choose one with lots of room for growth.
You need to consider the type of ecommerce website you are building when choosing the best hosting provider.
Namehero came out as the best WordPress hosting provider in our research. WordPress is a bit more difficult to manage and maintain than e-commerce platforms and builders. You’ll need to first install the software and then keep up with security updates and security. Namehero is a great choice because it does all of this automatically and offers solid hosting at a very affordable price. Namehero is a great provider for WordPress.
Namehero’s web hosting plan is a great choice, whether you are just starting out with a few products and/or you expect your business to grow in the future. Namehero‘s Woocommerce plans don’t just make e-commerce easy. They’re built to simplify your life and include one-click payment processing installations and an automatically installed storefront theme. You can also sell unlimited products.
Before you move on to the next step, ensure that you have:
- Thought about what kind of web hosting you need
- Signed up for a hosting plan
STEP THREE
Install WordPress
There are two main methods to install WordPress.
a. ‘One-click’ WordPress installation
b. Manually download WordPress and then upload it to your hosting account
‘One-click’ WordPress installation
The first option, as you might expect is the easiest and the one we recommend. Look for hosting providers like Namehero that offer ‘one-click’ installations when choosing a host.
Click Here To Get Started With Our Recommended Web Hosting Company Which Is Namehero
After signing up with a hosting company that offers this type of installation, all you need to do is log into your hosting dashboard and click the button that says “Install WordPress”.
Manual WordPress installation
If your hosting provider does not offer one-click WordPress install, you can download WordPress to your computer and then upload it to your hosting dashboard. Although it is simple enough, it is not as easy as it seems.
Before you move on to the next step, ensure that you have:
Installed WordPress, either manually or through your hosting provider.
STEP FOUR
Install and configure WooCommerce
WooCommerce is the most used WordPress plugin to add ecommerce functionality. Over 3,000 users have rated it 4.6/5 and there are more than 4,000,000 active installations. It is easy to see why it is so popular.
It’s also free for starters. WooCommerce, like WordPress itself is an open-source platform that was built by a community. Some ‘extensions’ may require you to pay extra (e.g. the ability for customers to book appointments), you can turn your site into an online store without spending a dime. That includes:
- Product pages
- Cart and checkout
- Secure payments
- Shipping options and label printing
- Automated tax calculations
- Integration with Google Analytics, Facebook, MailChimp etc.
Top Tip: It’s very easy to set up WooCommerce with Namehero. One of the biggest drawback of an eCommerce store can be getting everything ready to go live, but that’s not the case with Namehero’s WooCommerce plans. These plans come pre-installed with a theme for an online store and offer one-click installations for payment processing.
As you can see, we are very excited about WooCommerce.
We’ll assume for now that this is what you will be using and guide you through installing and configuring it.
1. Install and Activate WooCommerce
Log in to your WordPress dashboard, move to the plugin directory by clicking ‘Plugin’ on the left-hand menu
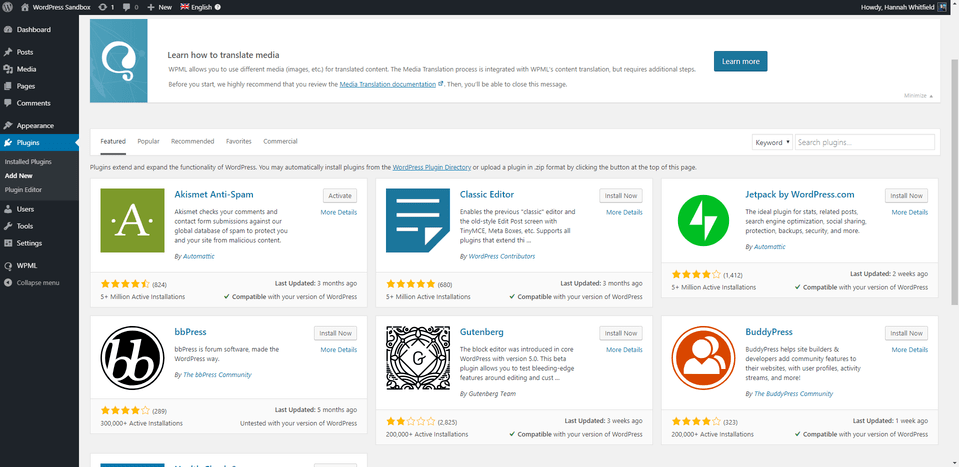
Search for ‘WooCommerce’ in the search bar, and then click the gray ‘Install Now’ button.
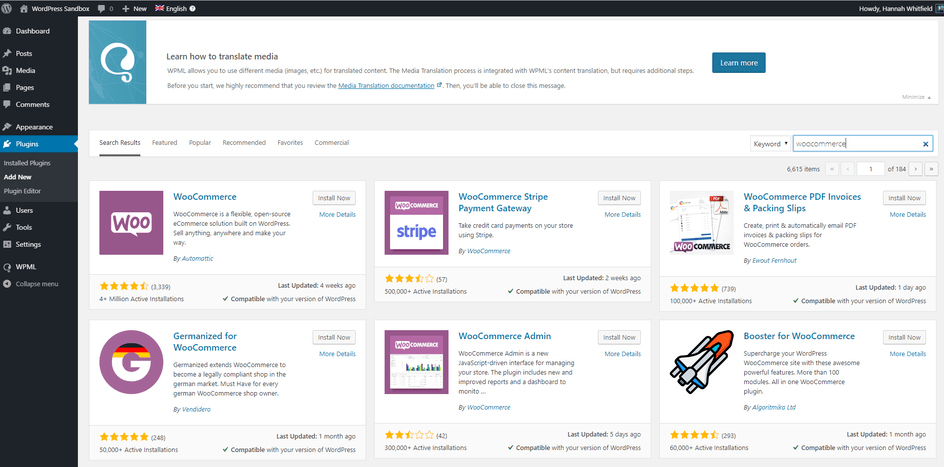
The helpful setup wizard for WooCommerce will then be available to guide you through the rest of the set-up process.
2. Add business details
First, you’ll have to fill out your business details, which is straightforward
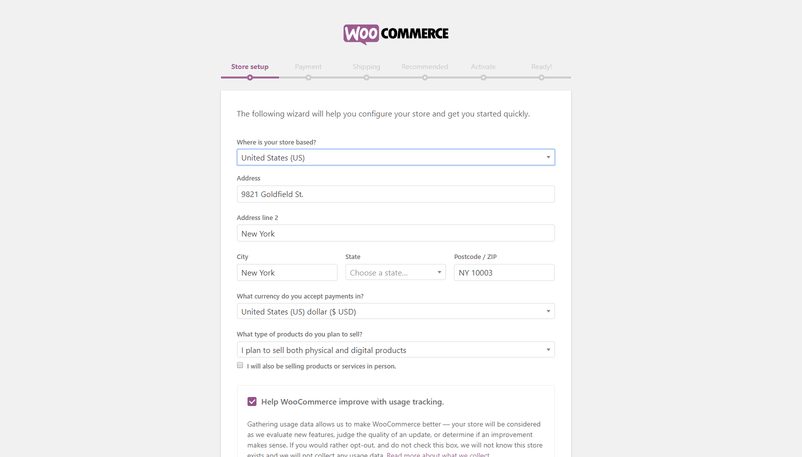
Select the correct option under “I plan to sell both digital and physical products”.
It’s important to know that digital products can be anything that is downloadable, such as WordPress themes, online courses, stock images, and so on. A digital camera would, on the other hand, would be a physical product.
3. Select payment options
Next step is to select the payment methods you’ll accept through your store.
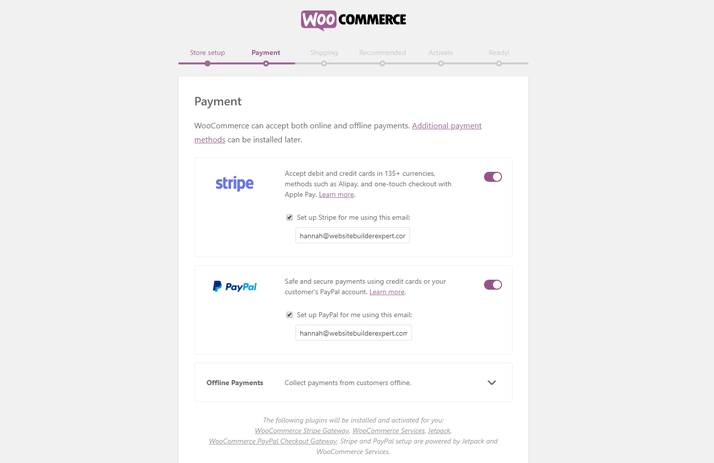
We recommend that you enable Stripe and PayPal as both are popular options. You can add your accounts later if you don’t already have them set up.
4. Confirm shipping options
Next, you will be asked to select your shipping rates. WooCommerce will identify the location you are currently in and assign this area as your primary ‘shipping region’. The other option is ‘the rest’.
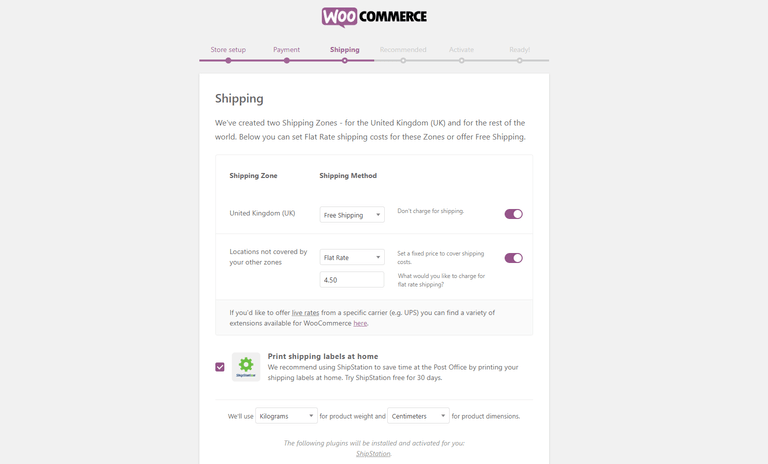
You have the option to set a fixed price per zone, make shipping free or integrate with specific carriers (including UPS), to receive ‘live’ shipping rates.
5. Choose complementary plugins/theme
Next, you will need to choose which plugins are recommended for your store and whether or not you prefer WooCommerce’s theme.
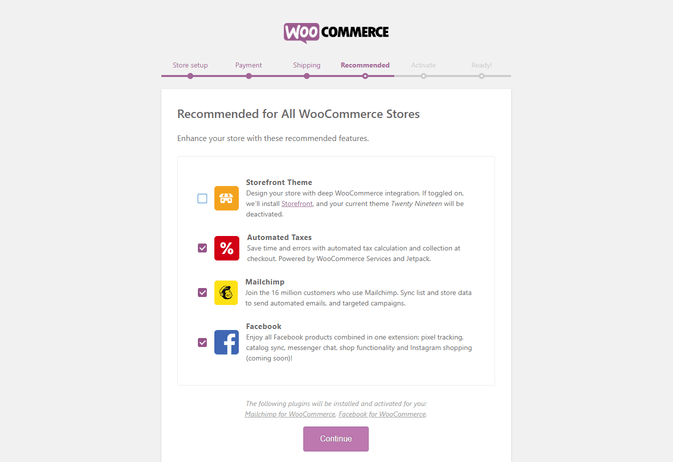
These plugins and themes can be added later, so don’t feel obligated to do anything right now. We’ll cover recommended plugins and themes later on in this article, so feel free to ‘unselect’ these for now, unless you’re sure you need them.
6. Activate Jetpack
In the final configuration step, you’ll be asked to activate Jetpack.
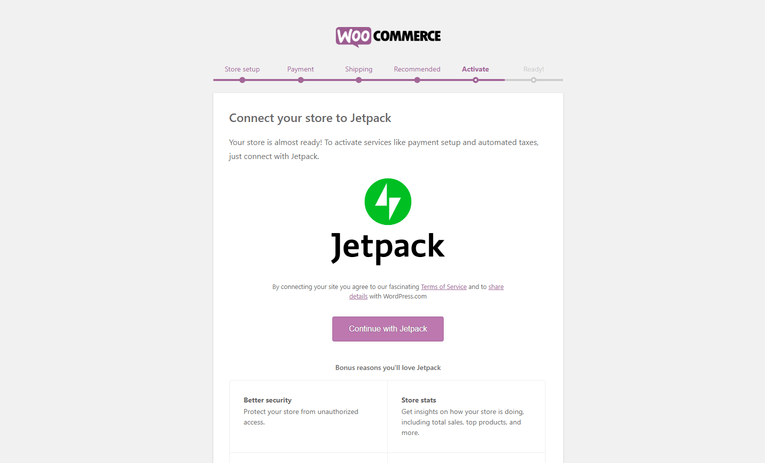
This will allow you to automate taxes and payment setup later. Click ‘Continue with Jetpack’
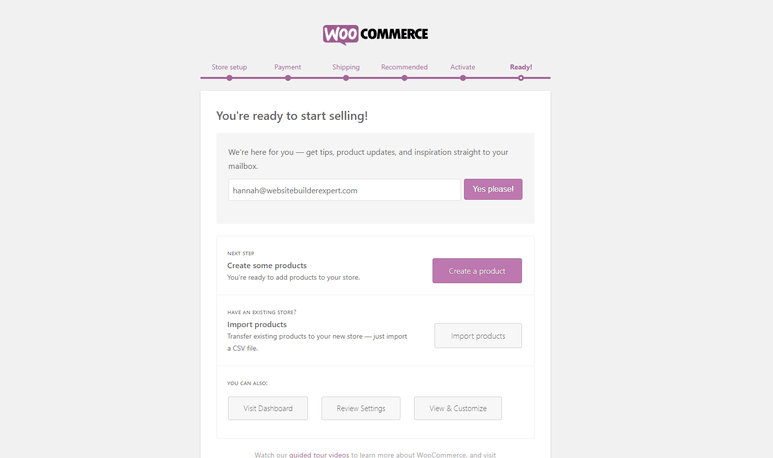
That’s it! Your basic configuration is now complete. Now it’s time for you to add your products.
Before you move on to the next step, ensure that you have:
- Found WooCommerce in the WordPress plugin directory, installed it, and activated it
- Added your business details
- Chosen shipping and payment options – remember, you can change these later.
STEP FIVE
Choose a theme
Your theme will be the basis for all of your web content. WordPress’s beauty is its flexibility. You can easily modify or add to the HTML code to create a completely new design.
However, unless your coding skills are advanced and you would love to be able to customize the theme to suit your needs, it is a good idea to pick a theme that matches your final product.
In other words, choose a theme that you like, and that will work well for your ecommerce website, even if that means splashing out on a premium template from a third-party site. It’ll save you a lot of effort in the long run.
Popular third-party sites for buying themes include ThemeForest (huge selection) and Elegant Themes (smaller, curated selection), but there are a ton of great sites out there.
After you have a good number of products, it is time to choose a theme.
A selection of free WordPress themes can be found in the theme directory. You can access it through your dashboard.
- Log in to your WordPress dashboard.
- Hover over ‘Appearance’, then click ‘Themes’. This will take you to the theme dashboard.
- Click the button above the themes that says ‘Add New’, then browse themes under ‘Featured’, ‘Popular’ etc., or use the search bar to search for specific industries.
- Demo a few themes to find the one you like, then hit ‘Install’ under the theme to download it.
- After a few minutes, a button will appear under the theme that says ‘Activate’. Click this, and the theme is all yours.
To install a premium theme on your site:
- Download the .zip file of your new theme.
- Log in to your WordPress Dashboard.
- Hover over ‘Appearance’, then click ‘Themes’. This will bring you to the theme dashboard.
- Click the button that appears above the themes that says ‘Add New’. This will take you to the WordPress theme dashboard.
- Click the blue button at the top that says ‘Upload Theme’.
- You’ll then be asked to choose a .zip file from your computer. Select your new theme file.
- You’ll then see a success message, with a link to activate your theme. That’s it! You’re now ready to go.
Top tip: WooCommerce has its own theme, Storefront. This works well with WooCommerce and looks great.
That said, because anyone can theoretically build a template and upload it on the internet, it’s important you assess whether the template is trustworthy. You could be vulnerable to hackers if you choose a poorly-designed theme. Don’t forget to “demo” each theme to see how it might look on a real site.
Before you move on to the next step, ensure that you have:
- Browsed both free and premium themes
- Found a design you liked, and tried it out using the ‘demo’ function
- Checked the reviews to make sure it’s reliable
- Installed the theme (different methods for themes in the directory and those bought from a third-party site – see steps above)
STEP SIX
Add products
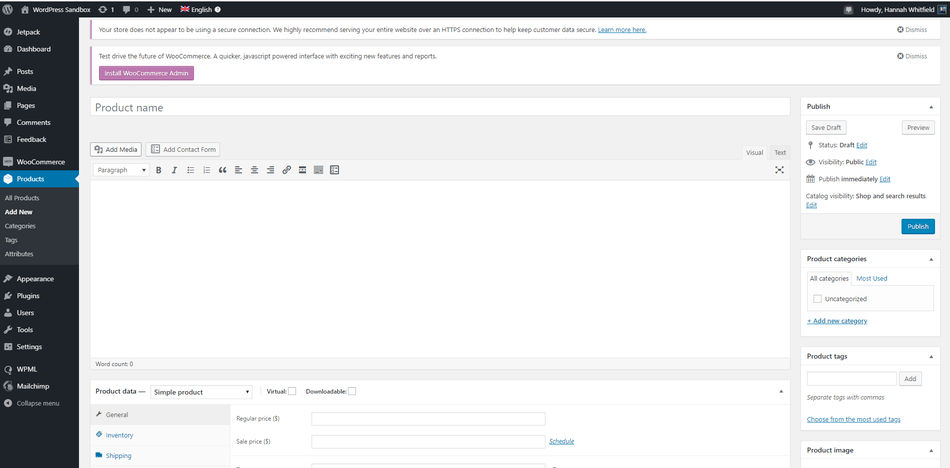
After installing Jetpack, in the final stage in your initial WooCommerce configuration, you will see a screen inviting to add your first product.
If you’re not ready to upload yet, it’s fine. When you return to your dashboard, just go to ‘Products’ down the left-hand side, then ‘Add New’:
These are the things you will need to upload for every product:
- Product name: e.g. Cute Pale Grey Cement Plant Pot
- Price: e.g. $12.95
- Main product image: this should be a picture of the entire product, from the front
- Additional product images (optional, but highly recommended): include pictures from as many angles as possible, and add closeups of finer details
- Product Description (long): e.g. ‘Inject some Scandinavian cool into your home with this simple cement planter. Features a drainage hole and comes with a small matching dish, so your plant won’t get over-watered. Height: 15cm. Diameter: 8cm.’
- Short product description: e.g. “Simple cement planter with matching tray and drainage hole.”
- Product category (if you have more than one): e.g. Plant Pots
Adding products with WooCommerce
The type of product that you are adding to your website will determine how you add it. There are six main types of products:
- Simple
- Grouped
- External/Affiliate
- Variable
- Downloadable
- Virtual
WooCommerce provides a detailed guide that explains each product type and how to upload them.
We’ll keep the plant pot example for now. This is a basic product. The pot in question does not have other sizes or colours. If it did, be a variable product.

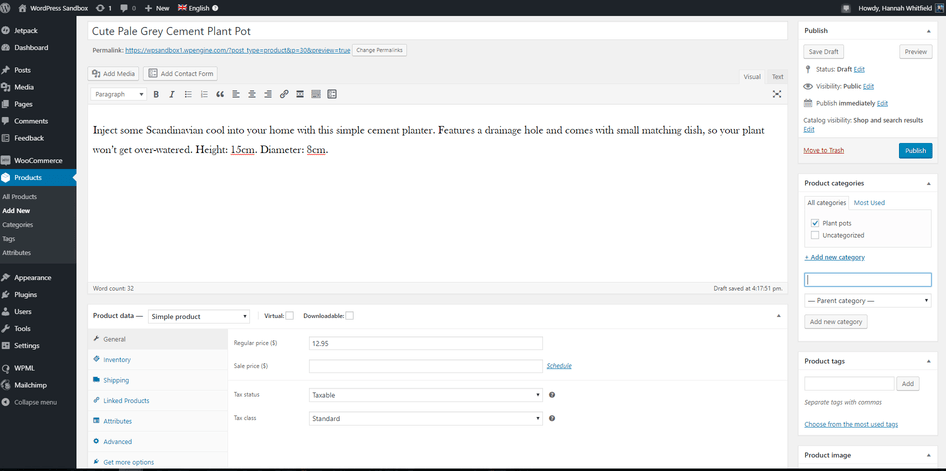
This is how the screen has been populated with the information that we have provided above. You can see that we have added the product to the category “Plant pots” on the right-hand side. We just clicked ‘+Add new category’ which is underlined on the right, named our new category and selected it, then unselected ‘Uncategorized’. If we had more pictures of our plant pot, they would go in the ‘Product gallery’ section under the main image.
After you have added the key information, click through the tabs in the middle to complete the product details. Let’s take a look at what each tab covers in the product data section.
- General: This is our current tab and includes price and tax
- Inventory: This is where you can add SKUs, etc. If you wish to keep track of your inventory
- Shipping: Product dimensions and shipping cost
- Linked products: Update later with products that complement each other to upsell
- Attributes: If you have a product with variable dimensions (e.g, one that has different colour options or sizes), this is where to add them.
When you are satisfied with your product click the blue “Publish” button towards the top on the right-hand side.
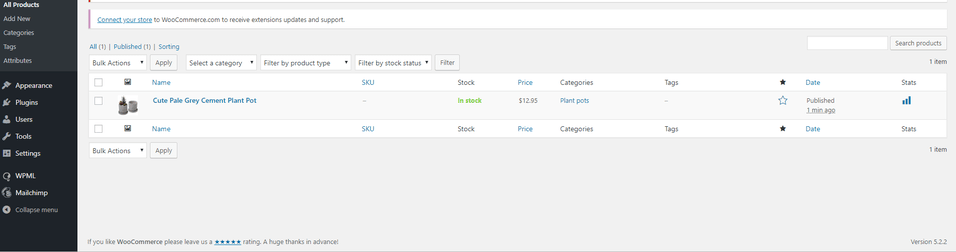
You can view any products that you have published by going to “All products” in the menu on the right. They will appear as follows:
Before you move on to the next step, ensure that you have:
- Written a title, long description, and short description for each product you want to upload
- Taken product pictures
- Uploaded products to your WordPress dashboard
- Organized products by category
STEP SEVEN
Install additional plugins
We rate the following plugins for online shops as highly as WooCommerce.
1. Yoast for SEO guidance
Having the best online store in the world won’t matter if no one can find it. Yoast SEO is a handy plugin that will help your site climb the search engine rankings and give you the best chance of landing on page 1. SEO stands for search engine optimization. It’s about making small changes to your website to make search engines better understand your content and prioritize it accordingly.
2. Sucuri for security
Security is more important when you accept card payments through your ecommerce website. Wordfence is a free security plugin, but we believe this area is worth the extra effort. Sucuri plans start from $199/year. To enable the plugin, you will need to download the free plugin from WordPress directory.
P.S. – We probably don’t need to say this, but securing your ecommerce website is very important. So don’t push it into the “too hard” pile.
3. Site Reviews for reviews
Social proof has been proven to be one of the most powerful factors in getting people to do what you want. In this instance, it would be buying your products. Customers will be able to leave reviews on your site by installing Site Reviews.
It is easy to add plugins to your website:
- Log in to your WordPress dashboard.
- Head to ‘Plugins’, then ‘Add New’.
- Make use of the search bar in the top right-hand side to search for specific plugins, or the general feature you’re looking for.
- After you have found the one that you like, read its reviews and ratings to make sure it is trustworthy.
- After you are satisfied with your selection, click the “Install Now” button.
- After WordPress has downloaded the plugin, you will receive a message confirming that it was successful. Next, you will be asked to click “Activate Plugin”.
- Next, go to settings to configure the plugin. Each plugin will have a different process, but you should be able to follow the instructions in your plugin description.
Before you move on to the next step, ensure that you have:
- Thought about any extras you need for your ecommerce website
- Found the right plugins to add this functionality
- Checked reviews to make sure they’re trustworthy, before then installing
STEP EIGHT
Add content that converts
It’s now time to modify the copy on your key web pages. These key pages can be found by going to “Pages”, then “All Pages”.
A complete guide to writing for the internet has been created by us. It is jam-packed and full of advice from experts in copywriting. Make sure you take a look.
We’ll focus on a few types of content for now. Follow the elements below and you’ll be well on your way to creating a successful ecommerce website.
1. Microcopy
“Microcopy”, also known as “UX copy”, refers to small pieces of navigational text on your site as well as error messages and ‘calls to action’ (CTAs).
Word for word, this is the most important copy on your site. It directs users to your site and convinces them at crucial points (such as when it’s time for them to part with their cash).
This should be written with care. Consider the mindset of your users at every stage of their journey through your ecommerce website. For example, on the homepage, it might be more appropriate to have a button that leads to your product saying ‘Find out more information’, or ‘Have a browse’. Something pushier, like ‘Buy now’, might be very off-putting. At this stage, your user is interested in finding out about your brand, but probably not ready to buy.
2. Product descriptions
These should be concise, but helpful and, as the name suggests, descriptive. Consider everything you would need to know when buying that product for yourself, especially if it isn’t obvious from the photos. You can use bullet points to separate the information and keep the format and info consistent across products.
3. Product images
The quality of your product images can make or break your site. For best results, use a high-quality camera with a simple background. A general rule is, ‘the more product photos, the better’. Keep your product images consistent with the descriptions for a clean-looking website.
Top tip! Use TinyPNG and Kraken to compress images. This will help reduce the file size without compromising image quality, helping to keep your site as fast as possible.
4. Privacy Policy
WordPress will ask you to choose a privacy page before making your website public. There is a template that you can use to help you get started.
Click here to generate a free privacy policy for your website
Before you move on to the next step, ensure that you have:
- Personalized the content of your website, including the main cart and shop pages
- Carefully crafted persuasive CTAs and helpful navigational copy
- Written and uploaded a privacy policy page
STEP NINE
Make your ecommerce website public
Once you’re happy with how your ecommerce wesite works (remember you can always ‘Preview’ pages to see how they’d look live), you can make it public. This is the easy part.
Click on ‘Settings’ and then ‘Privacy. After you have uploaded your privacy policies, you will be able to make your site public.
Before you move on to the next step, ensure that you have:
- Made your site public, so people can start shopping.
Conclusion
We’ve aimed to make this guide as easy as possible, but the reality is that WordPress is best-suited to those who have some tech experience. If (like many) you don’t think you belong to that category, not to worry, ecommerce website builders are designed to be easy for anyone to use, and prices start at just $15/month.